- Introduction
- Registration
- Log In
- Navigation
-
Eligibility Lookup
- Initiate Eligibility Lookup
- Initiate Patient Status Lookup
- Beneficiary Eligibility Information Panel
- Part B Deductible
- Medicare Advantage
- Medicare Secondary Payer
- Crossover
- Qualified Medicare Beneficiary
- Home Health Plan
- Hospice Notice of Elections
- Hospice Benefit Periods
- Inpatient and SNF Spell History
- End Stage Renal Disease
- Preventive Services
- Audiology Screening
- Hepatitis Screening
- COVID-19 Vaccine
- Flu Vaccine
- Pneumococcal Vaccine
- Cardiac Rehabilitation
- Pulmonary Rehabilitation
- Acupuncture Benefits
- Smoking Cessation Counseling
- Cognitive Assessment and Care Plan Information
- Therapy
- Diabetes Self Management Training (DSMT)
- Medical Nutrition Therapy (MNT)
- Accessing Eligibility for MDPP in NGSConnex
- Claims Status Inquiry
- Part B Claim Submissions
- Appeals
- ADR
- Inquiries
- Resources
- MBI Lookup
- Remittance
- Part A Prior Authorization Request
- Part B Prior Authorization Request
- Financials
- Manage Account
LSO Responsibilities
The LSO is responsible for managing and monitoring access for other NGSConnex users within the organization.
- LSOs are responsible for approving access to users requesting data access to a specific provider account (NPI, PTAN, TIN) within their organization. Once a user has successfully registered for a provider account, the LSO should carefully review the users’ requests to ensure they are granted only the access they need.
- LSOs are required to review all user accounts within their organization to ensure that each user has the appropriate access each year; every 365 days.
- LSOs must immediately remove access from users’ whey they leave the organization or no longer have a need to know the information within NGSConnex.
- LSOs should also review and edit system access to ensure that the users have the minimum necessary access to information within NGSConnex.
Approve/Edit/Decline Data Access Requests – LSOs Only
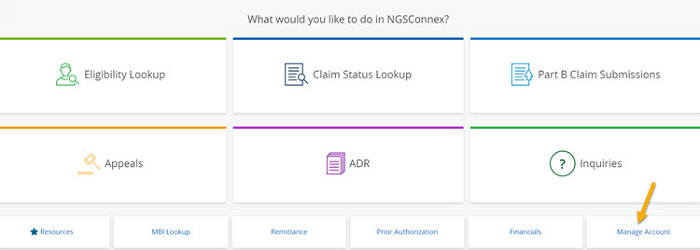
- Click the Manage Account button on the NGSConnex homepage.

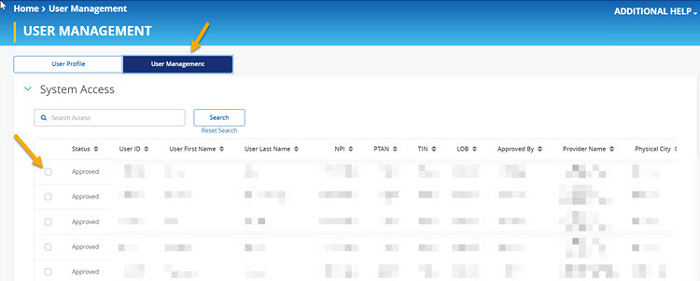
- Select the User Management button. If you are not an approved LSO for any provider organizations in NGSConnex this button will not be available.
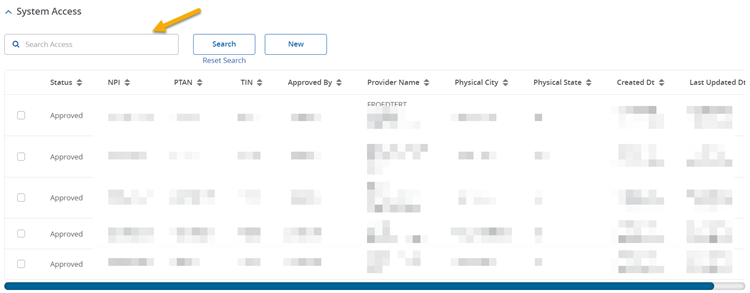
- Search for the User ID of the person you need to approve/modify or decline data access for in the System Access panel. Note: You can use the 'Search Access' field to search for a User ID, User Name, Provider, etc. or, you can scroll through the records.
- Click the checkbox to select the User ID. Note: If the Access was previously declined by an LSO, the User ID information will no longer display.

- If the Status is ‘Requested’ the following options will be available.
- Edit Access – this will allow you to edit the functionality the user has access to in NGSConnex, by selecting or de-selecting the applicable checkboxes.
- Provider Profile
- Claims
- Eligibility Lookup
- Financials
- You can also change the type of account from standard to LSO, by selecting the User Management checkbox and entering check information.
- Approve – When you approve a request, the Status will update from Requested to Approved.
- Decline – When you decline access, after you refresh the page the request will no longer be displayed in the System Access panel. The user will see the request as declined. Note: Enter a comment in the ‘User Management Comments’ section to indicate why access is declined. The comment will display for the user to indicate the reason access was declined.
- Edit Access – this will allow you to edit the functionality the user has access to in NGSConnex, by selecting or de-selecting the applicable checkboxes.

- If the Status is ‘Approved,’ select the Edit Access button and the following options will be available:
- To Edit Access for the functionality the user has access to in NGSConnex, select or de-select the applicable checkboxes.
- Provider Profile
- Claims
- Eligibility Lookup
- Financials
- You can also change the type of account from standard to LSO, by selecting the LSO/User Management checkbox.
- Decline – If you 'Decline' a user's access in NGSConnex, they will no longer be able to perform transactions for the provider account (NPI, PTAN, NPI). When you decline access, after you refresh the page the ‘User ID’ will no longer be displayed in the System Access panel. The user will see the request as declined. Note: Enter a comment in the User Management Comments section to indicate why access is declined. The comment will display for the user and will inform them of the reason access was declined.
- Cancel – If no changes need to be made, select the Cancel button before selecting another User from the System Access list.
- To Edit Access for the functionality the user has access to in NGSConnex, select or de-select the applicable checkboxes.
Note: You should notify the user when you add access to new functionality or remove access to functionality, they previously had available, decline access or update the account type from standard user to LSO or LSO to standard user. The user will not be notified by NGSConnex.

Recertify Users Access
If you are an LSO for a provider organization and you have not recertified access for standard users within the last 365 days and you select the Manage Account tab in NGSConnex and then select User Management, the NGSConnex LSO Security Awareness Training will display.
- Review the NGSConnex LSO Security Awareness Training.
- You must attest to the training and recertify the NGSConnex users, to be able to approve, decline or update access for standard users, within the provider organization.
If you or another LSO for the provider organization fails to recertify the standard users access within the last 365 days and the standard user logs into NGSConnex, selects any functionality and then selects the provider account, the system will display the following error message:
You will not be able to move forward and use NGSConnex until one of your LSOs completes their recertification.
We highly recommend that LSOs recertify users access more often than the minimum requirement of yearly. As a reminder LSOs are responsible for the following:
- LSOs must immediately remove access from users whey they leave the organization or no longer have a need to know the information within NGSConnex.
- LSOs should also review and edit system access to ensure that the users have the minimum necessary access to information within NGSConnex.
- Select the checkbox next to the user you wish to recertify.
- After you have reviewed access and you are ready to recertify the user(s), select the Recertify All Users Access button.
Revised 1/3/2025