- Introduction
- Registration
- Log In
- Navigation
-
Eligibility Lookup
- Initiate Eligibility Lookup
- Initiate Patient Status Lookup
- Beneficiary Eligibility Information Panel
- Part B Deductible
- Medicare Advantage
- Medicare Secondary Payer
- Crossover
- Qualified Medicare Beneficiary
- Home Health Plan
- Hospice Notice of Elections
- Hospice Benefit Periods
- Inpatient and SNF Spell History
- End Stage Renal Disease
- Preventive Services
- Audiology Screening
- Hepatitis Screening
- COVID-19 Vaccine
- Flu Vaccine
- Pneumococcal Vaccine
- Cardiac Rehabilitation
- Pulmonary Rehabilitation
- Acupuncture Benefits
- Smoking Cessation Counseling
- Cognitive Assessment and Care Plan Information
- Therapy
- Diabetes Self Management Training (DSMT)
- Medical Nutrition Therapy (MNT)
- Accessing Eligibility for MDPP in NGSConnex
- Claims Status Inquiry
- Part B Claim Submissions
- Appeals
- ADR
- Inquiries
- Resources
- MBI Lookup
- Remittance
- Part A Prior Authorization Request
- Part B Prior Authorization Request
- Financials
- Manage Account
Create an Account – Standard
Table of Contents
Create an Account – Standard
An NGSConnex Standard Account holder will have access to the different functions within NGSConnex as approved by their provider organizations Local Security Officer.
There are multiple steps in the registration process. You must complete the entire registration process during the same session. You will not be able to complete part of the steps and save the information and return to complete the process. Each step is important in the registration process and must be completed in its entirety for you to gain access to NGSConnex.
Each person must register for their own NGSConnex User ID. The sharing of NGSConnex accounts is strictly prohibited and may result in the revocation of your account.
Before you begin the registration process, be sure to have all the required information ready and available.
- National Provider Identifier
- Provider Transaction Access Number
- Last five-digits of the tax identification number
You may only request access to one provider account during the registration process but may add additional provider accounts under the Manage Account – User Profile section after you complete the registration process.
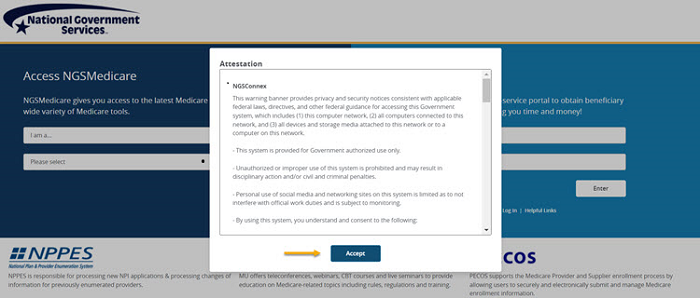
- Go to the NGSMedicare.com combined landing page.
- Read the Attestation and click Accept to continue.

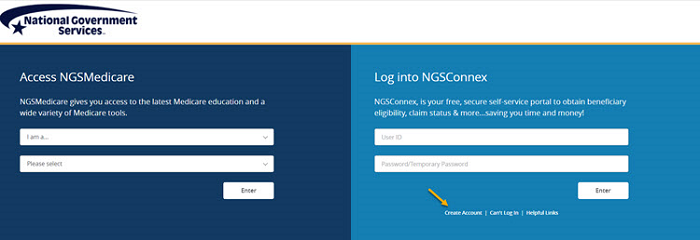
- Select the Create Account link on the ‘Log into NGSConnex’ side of the combined landing page.

- Read the Online Services & Web Confidentiality Agreements and click on the check box at the end that reads, “I have read and understand the above statements.” Then click I Agree to continue.
Step 1 – Account
- A User ID will be auto-generated for your account. You will need to create a password for your newly-generated User ID.
- Enter a Password for your account. The password must consist of between 8-30 characters in length and include the following components:
- one lower case alphabetic character
- one numeric character
- one special character
- one uppercase alphabetic character
- Enter the password in the Re-Type Password field.
- Click the Next button.
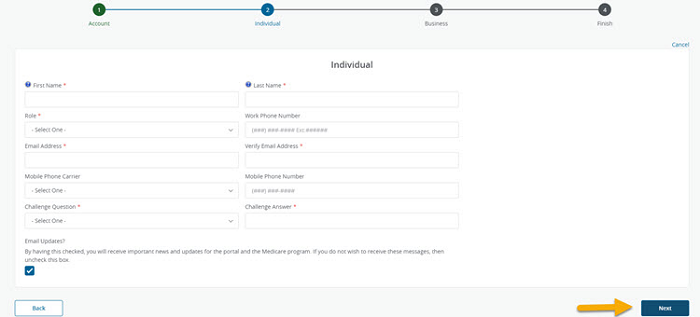
Step 2 – Individual
- Complete all of the required fields.
- First Name – first name of the person that will be using this User ID.
- Last Name – the last name of the person that will be using this User ID.
- Role – click the drop-down arrow and select your role from the list.
- Work Phone Number – if possible, include a direct number where you can be contacted.
- Email Address – this should be a unique email that you have direct access to. The system will validate the email address entered is unique and has not been previously used.
- Verify Email Address – re-enter the email address
- Mobile Phone Carrier – click the drop-down arrow and select your mobile phone carrier
- Mobile Phone Number
- Challenge Question – click the drop-down arrow and select your challenge question
- Challenge Answer – enter the answer to your challenge question. The challenge answer is not case sensitive. The challenge question and answer will be used if your account is suspended or when you need to reset your password.
- Email Updates – The box will automatically be checked, you will receive important news and updates for NGSConnex and the Medicare Program. If you do not wish to receive these messages, then uncheck this box.
- Click the Next button.

Step 3 – Business
If your provider organization does not currently have an LSO for NGSConnex, you or someone in the provider organization must register as an LSO.
You may only request access to one provider account during the registration process but may add additional provider accounts under the Manage Account – User Profile section after you complete the registration process.
- Complete all of the required fields.
- Respond to the question: “Will you be a Local Security Officer (LSO) for your organization?” by selecting the applicable radio button. If you are registering as a standard user, you should select No.
- NPI – National Provider Identifier
- PTAN – Provider Transaction Access Number
- TIN – Tax Identification Number
- Line of Business – Part A, Part B, or HH+H
- State
- Access – Generally, most users will request access for all of systems. The LSO for your organization will review and approve to ensure you have the appropriate access
- Provider Profile
- Financials
- Claims
- Eligibility Lookup
- Click the Finish button. Once you click the Finish button the following message will display: “Success: You have successfully created your account.” You should review and follow the instructions provided.
The LSO for your organization will receive an email to inform them you have requested access, you will receive a copy of the email sent to them. Once the LSO has reviewed and approved your User access you will be able to view information and perform transactions within NGSConnex.
You can check the status of your request by logging into NGSConnex and selecting the Manage Account button on the NGSConnex homepage.
You will receive an email to notify you when the status is updated.
Revised 2/4/2025